Berry Oatmeal Bake

Need to bring a item to pass at a Baby Shower or Easter Brunch? This delicious (gluten free, dairy free!) Berry Oatmeal Bake will definitely add some variety to the usual brunch spread.

This recipe is 3 year old approved, although she specifically requested “No nuts next time we make this. Okay, mom?”

Enjoy!

IMG_2894

Berry Oatmeal Bake

Prep Time: 15 minutes
Cook time: 35 minutes
Total Time: 50 minutes
Serves: 10 (ish)
Note: for thicker oatmeal bake, double batch in same 9×13 pan and add about 5 minutes to cooking time

Ingredients:
・1 3/4 c water (or non-dairy milk)
・3 cups UNCOOKED whole old fashioned gluten free oats (we like Trader Joe’s best)
・1/4 cup melted coconut oil
・2 eggs
・1/2 cup pure maple syrup
・1/4 cup mashed banana
・2 tsp cinnamon
・1/4 tsp nutmeg
・1/4 tsp ground cloves
・1 tsp baking powder
・1 tsp pure vanilla extract
・1/4 tsp salt
・2 cups fresh berries chopped; set 1/2 cup aside
・1/2 cup chopped nuts – we used hazelnuts, but imagine pecans would be delicious, too

Instructions:
・Preheat oven to 350; move rack to lower 1/3 of oven
・Brush 9×13 pan with coconut oil
・Combine all ingredients (except nuts & 1/2 cup of berries) together in a bowl
・Pour combined ingredients into baking pan; sprinkle nuts & 1/2 cup of berries on top
・Bake 35 for softer set; 40 minutes for firmer set
・Let sit for at least 5 minutes before scooping & serving

Store leftovers in refrigerator for easy breakfast all week.

signature -blue

Apple Nachos

YUM. DELSIH. (almost) 21 DAY FIX APPROVED.

This treat is DELISH. It’s not quite “approved” by my regular meal plan, but it’s quite an improvement to a big bowl of ice cream or a sleeve of girl scout cookies…two items I can put down no problem 😉

I give you: Apple Nachos!

apple nachos - blog.jpeg

INGREDIENTS

Sauce:
2 tbsp boiling water
2 tbsp nut butter
1 tbsp honey

Toppings (pictured):
sprouted organic pumpkin seeds
slivered almonds
dark chocolate chips
NOTE: you can get creative here… raisins, coconut shavings, sunflower seeds, craisins, etc. Portions are up to you – use in moderation for healthier snack.

Other
1 apple (I like honeycrisp or granny smith)
cinnamon

DIRECTIONS:
-Bring water to boil.
-While water is boiling, slice apple into desired slivers; I prefer bit sized.
-Combine water, nut butter, and honey in a small bowl. Whip to creamy consistency – this takes a second; it gets clumpy before it gets smooth.
-In separate bowl, mix together dry toppings. The amount is up to you; enjoy in moderation for a healthier snack.
-Spread 1 layer of apple slices on plate, sprinkle with cinnamon, drizzle sauce, then sprinkle with toppings. Add remaining apples to top layer, drizzle remaining sauce, then sprinkle with toppings.

ENJOY!

blog sign

Do your homework- what you should know about Shakeology…

“I don’t really want to give Shakeology a shot- I’d rather eat whole foods.”
I. Hear. You.
…the longer I’m in this business, the more often I hear this phrase. Let me tell you that I understand you COMPLETELY. I was in this place, too…I wasn’t always a “supplement person”
I get you!
img_3631-2
You should also know I drank Shakeology DAILY FOR ELEVEN MONTHS before I ever started a business — so let me preach about a product I LOVE (just like I’d tell you about that cute new restaurant downtown, my awesome experience at the genius bar AGAIN, or a worthwhile new movie…)
 .
Here it goes. What is Shakeology?
 .
Let’s start with what it’s not…
👉Shakeolgy is NOT a protein shake. Yes, there’s 15+ g of protein in it (depending on flavor), but if you’re looking for just a post workout protein drink, let me help you look elsewhere.
👉Shakeology is NOT diet trick/pill or a chemically appetite depressant.
 .
It is…
👉a dense dose of nutrition, made up of quality superfoods
👉natural with zero additives or extra junk
….all that and it STILL tastes like chocolate. or strawberry. or cafe latte or greenberry. or vanilla. {disclaimer: When I used to bend up the entire produce section, it definitely did NOT taste like chocolate….😝}
 .
Yes – there are protein drinks or meal replacement shakes out there that cost less than Shakeology. I’ve done my homework; I can tell you the whole “you get what you pay for” is certainly true in this case…especially when you break down how the ingredients complement each other to work for your body OR whether or not the ingredients have been isolated from their enzymes. They’re not all made the same….
 .
AND get this.
There are VEGAN options, too… You know when you pick up an orange at the grocery store and can’t find a nutrition label because one orange might be slightly different than the one next to it? Same deal. The vegan formulas are SO RAW they’re considered unprocessed.
 .
Since I know you’re still reading, you’re probably curious why YOU should check it out even if you’re not a supplement person.
🍎regular digestion (said it. meant it.)
🍇experience cravings switch from junk food to healthy choices
🍊increased energy levels
 .
…and a few more bonuses my challengers were JUST talking about this weekend:
🍍clear skin (even when switching medication)
🍒thicker hair & nails
🍏increase in milk supply for nursing mamas
 .
Ready to give it a shot? Good.
Let me tell you how you can get a discount when you bundle it with our Workout Streaming Service (Beachbody On Demand)
 .
alischroeder.fit@gmail.com is the best ways to get in touch with me.
 .
Let’s do this💪🏼

IKEA Hack Coffee Table

cover

You may or may not know that when I moved from Wisconsin to California, my dad drove out with me and all my stuff, then flew back. We made it to somewhere in Iowa and broke down. Yup! That happened… Long story short (I didn’t get my car in CA until 33 days later) we ended up transferring everything from my car into a rental truck and going the rest of the way.

All items made the transfer EXCEPT (dun dun dun)….our coffee table!

It was a “beautiful” SOLID old piece my husband found on the curb during his college days. I cannot even tell you how many times that table has been danced on, spilled on, and dinged up. We kept it, though, because it was a genuinely sturdy piece of wood with a ton of character, many stories, and GREAT potential fora refurbishing.

{I’m not even sure how, but through coordination of a few traveling nomads, it ended up back in Wisconsin and is currently being stored in my dad’s shop…going on 3 years now. SOMEDAY!}

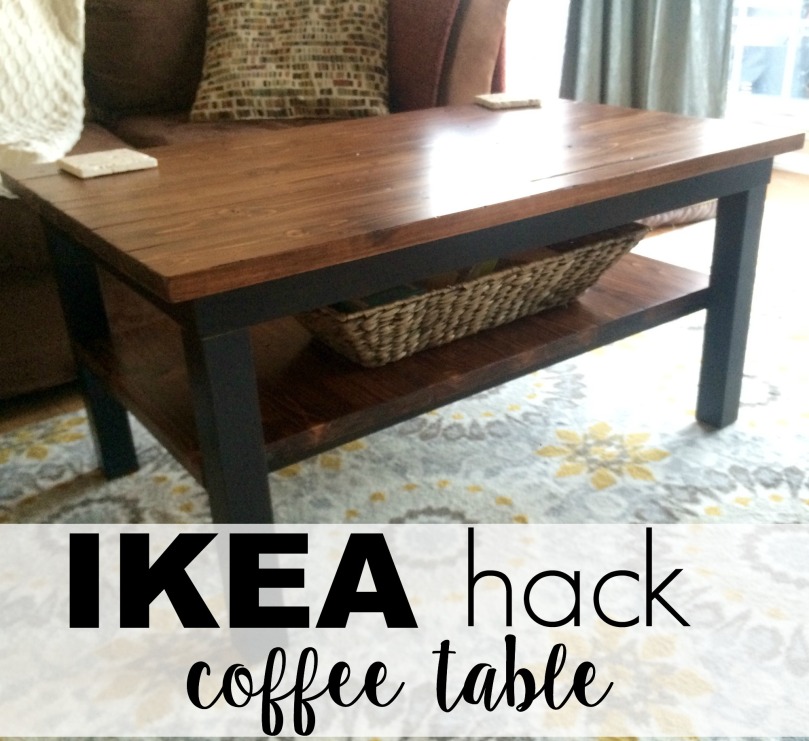
Upon arriving in California, we lived without a coffee table (for way too long), then finally broke down and bought a $19.99 piece of black plywood from IKEA. It got the job done, but didn’t ever really “fit”…especially once we bought & moved into our home.

lack-coffee-table-brown__57540_PE163122_S4-2
Last November we kind of decided it would be fun to tackle a team project…the coffee table seemed like a no brainer!

I searched around for a little inspiration, and found these two tables:

I’m very happy with how it turned out! Here is a loose set of directions if you’d like to make your own.

Supplies:
●IKEA table (or any old table)
●tape measurer & pencil
●wood slabs (cuts & amount dependent on design desire; see directions)
●saw horses
●table saw
●distressing tools (hammer, chisel, chain, wire brush, etc)
●sander
●desired color stain (brushes/sponges/rags)
●wood glue
●clamps (at least 4 small & 1 large)
●polyurethane
●patience

1) Making Cuts
First, decide what you want your table to look like. What kid of wood? How far should the edges hang over?

We ended up deciding to go with 4×1 slabs, and chose pine-because I like the character the knots add- with the wood hanging over on each end (approximately 1/5 inches on the ends & 1 inch on the sides). This is completely up to you.

  1. Take a few measurements
  2. Do a little math
  3. Head to the lumber yard & buy what you need
  4. Make cuts yourself, or have them cut right at the lumber yard
  5. Lay slabs out across saw horses as if a table top.

table wood

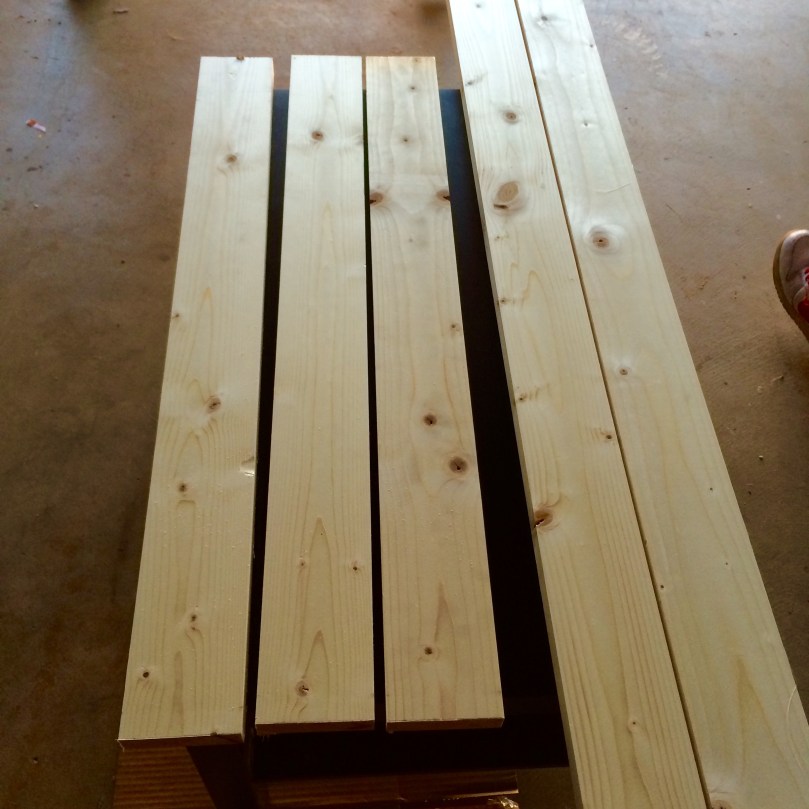
I then (spent way too much time) flipping, turning, and rearranging the boards to get just the look I wanted. We labeled the bottom to ensure they would stay in that order.

During this extensive flipping, turning, cutting, I decided to add a twist! (pun intended). Instead of both the top and the bottom levels of the table running parallel boards, I decided the bottom level slabs should run perpendicular with the top level. I like the dimension it added!

2) Distressing the Wood

I’ve never done this before! It was great fun. I was definitely way more “meticulous” than necessary – it is probably best to just go at it without thinking about it!

distress tools

We didn’t have a chain, otherwise I would have used that. Instead, I used a hammer, chisel, & wire brush. After seeing the end product, some of my favorite spots are the biggest gouges, which I didn’t know until after it was sitting finished and in my living room. Feel free to youtube a few videos on how to do this!

Here are a few of my favorite marks:

I would recommend sanding all the corners down so they’re somewhat curved, giving an older look.

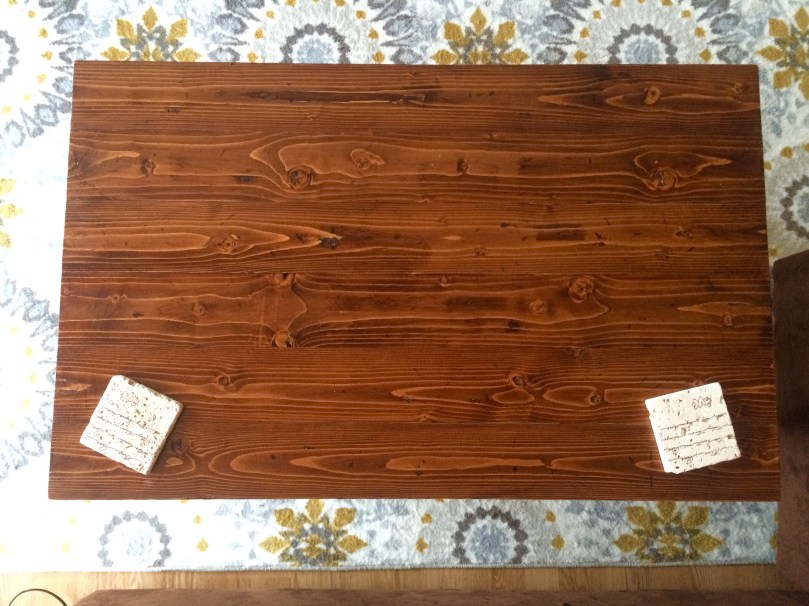
3) Staining the Wood

Grab a color stain that compliments the rest of your furniture, and start staining! I prefer to use a piece of cotton (rag, old t-shirt, etc) over a brush or a foam brush, but any are okay. Apply generously, wait 24 hours, then do it again! Be sure to go over the ends and underneath; anywhere the wood will be exposed.

stained wood

4) Applying Wood to Table

{We started with the bottom level first to “practice” as any mistakes would be less noticeable}

  1. Clean the old table, sand the surface for maximum adhesive, then clean again.
  2. Line up the boards as desired. Take a few measurements to make sure everything is set, then double check it just one more time.
  3. Remove one end board, apply glue to the top of the table, line up carefully, then place board to desired spot on table.
    glue on table
  4. Apply pressure being careful the board does not shift.
  5. Take the board next to it, apply glue to top of table and SIDE of board (that it will be touching), then press and hold it down.

  6. Continue and complete entire row. Repeat all steps for the 2nd level.

5) Applying Pressure with Clamps

Add clamps to ensure constant pressure is being applied for duration of dry time (see glue bottle).

clamped wood

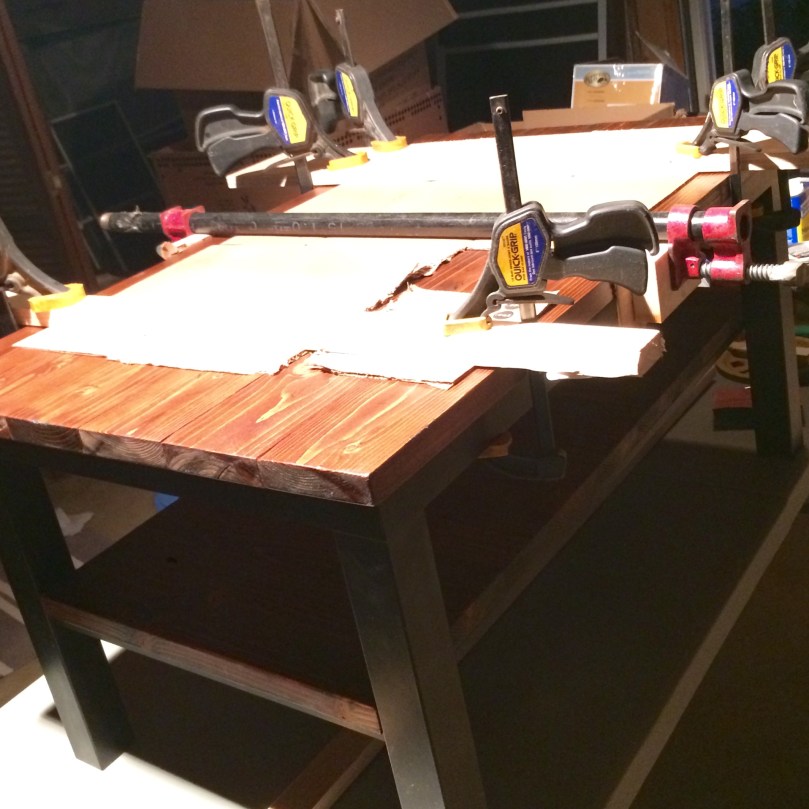
  1. Lay down a piece of cardboard on top of your table surface to prevent scratching.
  2. Lay a scrap 2×4 perpendicular across the top of the cardboard – we used two, one on either end of the table.
  3. Squeeze clamps on both ends of the 2×4 from top of surface to underneath in order to squeeze boards to table (see photo).
  4. In between these two boards, lay a large clamp (without a 2×4) perpendicular to the table boards. Squeeze clamp from  one side to the other in order to squeeze boards together (See photo).
  5. Let clamps sit for 24 hours

6) Apply Polyurethane 

poly

  1. Using a foam brush, spread a coat of polyurethane over your table to prevent stains from every day use.
  2. Let dry for about 24-48 hours, then apply at least one more coat.

Move your new table inside and enjoy!

Here was our final team product!

final 4final 2final 1final 3

Is it a forever piece? Nah.
…but it was definitely fun to create and will certainly get us through the next few years.

Share your own hack in the comments!

blog sign

Dark Chocolate Banana Bites

A friend introduced me to these sweet treats and now it’s my turn to pass them along!

They’re a healthy snack… easy to pop on the go!
My husband loves a few of them just before he works out; I like to have one (or two!) after I feed the baby.
Plus, this sweat treat is KID APPROVED. No dairy or eggs, either 🙂

The ingredients are simple:
✔️bananas
✔️nut butter (I used almond butter)
✔️unsweetened applesauce
✔️vanilla
✔️cinnamon
✔️nutmeg
✔️ground clove
✔️old fashioned oats
✔️dark chocolate chips

photo 1-8

First thing’s first- mash the bananas with a potato masher…


Add all ingredients except the chocolate chips & oats:

photo 4-8

Mix with a hand mixer until batter is smooth.

Fold in your chocolate chips and oats: photo 5-3

Line a baking sheet with parchment paper, scoop a round tablespoon onto the sheet, and pop in the oven at 350 degrees:
25 minutes for extra gooey
30 minutes for soft & chewy

photo 2-12

Remove and Enjoy!

photo 3-11
Full Recipe: makes 18-24 bites
Ingredients
2 ripe bananas
1/2c nut butter
2/3c unsweetened applesauce
1tsp vanilla
1/2tsp cinnamon
dash of nutmeg
dash of ground cloves
1/4c dark chocolate chips
1 1/2c old fashioned oats

Directions
+preheat oven to 350
+line a baking sheet with parchment paper & set aside
+mash bananas in bowl
+add nut butter, applesauce, vanilla, cinnamon, nutmeg, & cloves and mix with hand mixer until well blended
+fold in oats & chocolate chips
+spoon round tbsp of mixture onto cookie sheet, leaving an inch or two between (flatten slightly if you wish)

+Bake for 25 minutes & allow to cool slightly
>>> 25 minutes extra gooey
>>> 30 minutes soft & chewy

Four 4th of July Healthy Picnic Options

4th recipes cover

Happy Birthday, America! Are you  headed to a BBQ this weekend but not quite sure what to bring? Here are a few fun themed, healthy options! Click on the link for the full recipes.

4th quinoa salad

First up is the Quinoa Side Dish!
This delicious side is packed with protein and has a tangy citrus sauce. It’s hard to resist a little fruit in a side salad!

4th popsicles

Next are the Patriotic Pops!
Made with fruit & yogurt, these are hard to turn down. For a more balanced flavor it is best to mix all contents together, but of course they will look a little less patriotic.
One additional recommendation: use Chobani Plain Greek Yogurt and add your own honey instead of the recommended Greek Gods Honey Flavor. It is delicious, but that comes at a price of 33g of sugar per serving!

4th fruit skewers

I couldn’t leave out the classic themed Fruit Skewers.
These are so simple to make and kids can easily help out, too.
One additional recommendation: Start by mixing 1 cup of water with 3 tbsp of lemon juice. Place the banana slices in the lemon water to prevent them from browning, then string them on the skewer.

4th crisp

Lastly, is the no bake Berry Crisp.
This might not exactly be a picnic option, but it would be a great option for a 4th of July Breakfast!
One additional recommendation: Use Plain Greek Yogurt instead of the whip cream topping for a healthy kick.

Enjoy your holiday weekend!

signature -blue

Clean Eating FAIL! Not-so-delicious brownies

Processed with Moldiv

Typically speaking I have three requirements when it comes to cooking:
1) Must be healthy
2) Must be easy
3) Must be delicious

Every now and then one of these gets pushed to the wayside; there are times I definitely attempt a dish that is NOT easy….also times I indulge in something that isn’t healthy. There are even {rare} times I’ll choke down something that isn’t delicious because I’m in a hurry and I know it’s good for me.

NOT THIS TIME.

These 4 ingredient brownies were pretty easy and I guess somewhat healthy, but ohmygoodness they were so gross. I actually threw them away!

Sharing this recipe with you anyway; perhaps you can improve upon it {or just get a good chuckle out of it}. I am completely okay admitting when something doesn’t work out the way I would have preferred!

Here we go….

1) It was “healthy”
These ingredients aren’t too terrible; no flour or added sugar

Processed with Moldiv

2) It was easy!
Separate egg whites and egg yolks into two bowls.
Add honey, cocoa powder, and vanilla to bowl with yolks.
Beat whites until fluffy.
Fold in the egg whites and toss in the oven at 350 for 18-20 minutes.

photo 1-3 photo 2-7

3) It was NOT delicious (even though the photo might say so)!
Here is the finished product:

photo-13 photo-14

FAIL.

Maybe some of you are thinking, “Well duh. without sugar & flour dessert isn’t going to be good!” Not true….I have made plenty of flourless/sugarless treats that are pretty tasty (and not just by my standards, they’ve been husband approved, too!). This one just wasn’t one of them 😉

Better luck next time!

signature -blue

Mango Quinoa Side

This side dish is always a hit at BBQs & potlucks. Plus…it’s PRETTY!

Take a look at these tasty ingredients. How can it not be delicious?

photo 1-2

Make the quinoa as directed then toss it in the fridge while you prep the rest.

Optional Quinoa Cooking Tips for this Recipe
Quinoa Tip 1: Rinse the quinoa before cooking it; this will get rid of the grit
Quinoa Tip 2: Use half the liquid as chicken/veggie broth & half as water
Quinoa Tip 3: Cook the night before serving to ensure it is chilled for serving

photo 2-4

Beans: Rinse & Drain
Mango: Watch this youtube video of how to slice & dice a mango
Cilantro: I go way overboard; it’s one of my favorites
Red Pepper
: Chop away!
Red Onion: No Crying Allowed

photo 3-3

Combine above ingredients in bowl and stir with a spoon.

Sauce: Olive Oil & Lemon Juice
In a side dish, whisk together these ingredients until they become a little thick. Pour over quinoa mixture and fold in before the oil and juice have time to separate.

photo 4-3

Cover & Refrigerate for at least a half hour before serving in order to lock in flavor.

photo 5

Full Recipe

Ingredients 
2c cooked quinoa (about 1/2 uncooked)
1 14oz can black beans
1 mango (or 2 if you really like mangos) sliced & diced
1 red pepper chopped
1/4 red onion chopped
4 tbsp cilantro chopped
2-3 tbsp olive oil
2-4 tbsp lemon juice

Directions
Cook Quinoa as directed. Refridgerate.
Combine cooled quinoa, rinsed black beans, mango, red pepper, red onion, cilantro and mix together in large bowl.
In side dish, whisk olive oil & lemon juice until somewhat thick. Immediately pour over quinoa mix before it separates; fold into mix.
Cover & refrigerate for 1/2 hour before serving to lock in flavor

signature -blue

shakeO + pregO….do these two mix?!

{Disclaimer: Every pregnancy is different. Consult your healthcare professional before consuming…well, anything.}

Processed with Moldiv

Short answer: Yes! You better believe I am pumping the absolute BEST into my body as it’s busy building a tiny human!

Let’s back up a second, though. What exactly IS Shakeology?
Straight from the creator himself, “Shakeology is a supplement that contains some of the greatest nutrient dense super foods in the world. It is carefully formulated to give life enhancing potential for healthier mind & body as and stronger performing life.” -Darin Olien

BOOM!
All natural; zero artificial anything.
No, it’s not a protein shake.
Nope, no weird weight loss chemicals either.

What is Shakeology

Of course, when I found out I was pregnant, I asked a friend for a recommendation of a regular prenatal pill. She gave me the rest of a bottle she no longer needed & I stopped drinking Shakeology.

That lasted about a week.

I can’t say I had anything against that particular pill, but my body could totally tell I was fueling it differently (of course, some of the “symptoms” could be pregnancy related- I won’t deny that).

I decided to actually compare the labels and was amazed at what Shakeology had to offer! I couldn’t wait for my first appointment to see what the pros had to say.

Here’s an unbiased opinion if I’ve ever heard one….
My healthcare professional was BLOWN AWAY when I showed her the bag of Shakeology. No, she didn’t ask me for a sample, but said that Shakeology on it’s own is basically a prenatal and that it has so much great stuff in it. She actually recommended I continue to drink it! (Note: she did add an additional dose of over the counter folic acid.)

shakeo post

There you have it!
Shakeology replaces my prenatal.
Shakeology provides me with (much needed!) energy.
Shakeology helps with my digestion.
Shakeology cuts my cravings for other junk food (that my baby definitely doesn’t need!).

photo-8{I realize this is slightly creepy; just making a point!}

Soooo, yup! I’m pregnant & drinking Shakeology.
Personally, I think everybody should drink it…especially if you’re pregnant 😉

Feed your body what it deserves.
signature -blue

Pancakes? Or Crepes? Or…? YOU decide!

What are you having for breakfast?

YUM! I stumbled across this deliciousness this past week & gave it a shot. They were categorized as “pancakes”…

Were they delicious? YES.
Did they look like pancakes? YES.
Did they taste like pancakes? Um….sorta??

Most importantly {see #1}….they were delicious!

Just so you know what you’re getting yourself into, these mysterious pancake looking breakfast items LOOK like pancakes but are kinda missing the whole bread thing…. Honestly, I’d say they tasted like fluffy crepes…sweetness and all!

Why don’t YOU decide?!

Start with a banana, two eggs, 1/2 c old fashioned oats, 1/2 c unsweetened applesauce (21 day fixers can use half an apple instead of applesauce).

photo 1-2
Toss all that deliciousness in a blender and….well, blend!

photo 3-2

Pour a small amount of “batter” on flat griddle. Cook until small bubbles appear on top (see bottom two cakes), then flip. Cook on reverse side until golden brown (see top two cakes).

photo 2-2

Serve up & enjoy! The fruit makes them sweet enough no syrup is really needed. Of course, it’s your call.

Then let me know….pancakes? or Crepes?

Recipe: Pancake Crepes (makes 6)
Ingredients:
1  banana
2 eggs
1/2 c old fashioned oats
1/2c unsweetened applesauce (or half apple for 21 Day Fixers)

Directions:
Blend all ingredients.
Pour small amount on griddle; cooke until small bubbles appear.
Flip. Cook on reverse side until golden brown.