Top 4 Postpartum Products

top 4 cover

Having a baby, especially for the first time, is like walking into a whole new world you didn’t even know existed – ESPECIALLY when it comes to products! Where do you even start?

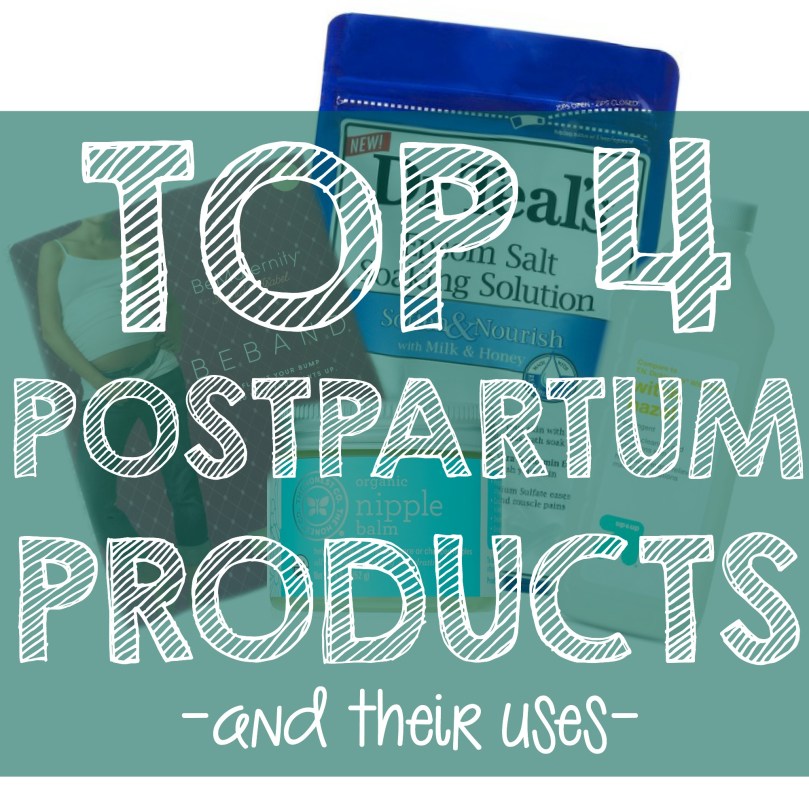
Here you go…my top 4 most useful postpartum products for Mama.

NUMBER FOUR: Beband!
found at: Target (maternity section)beband

This is technically marketed as a maternity item during pregnancy. The idea is you still get to wear your regular jeans, but don’t need to button or zip them. I used it for this a little while, but actually found it much more useful postpartum.

I found nursing tanks on top of nursing bras (especially in August) got bulky, clippy, and hot. When completely unfolded, the beband easily covers from your waits to your bra.

The REAL BONUS, though, was that it almost worked as a corset (if you really need one, they make those, too). Nobody told me how JUMBLED my core would feel. It felt like jello; most days I had to guide my hand on the wall as I walked down the hallway because my trunk was so weak. The beband worked as almost an “ace bandage” to help hold everything secure.

I ended up buying a second one in another color and wore them for about the first 6 months!


NUMBER THREE: Honest Company Nipple Balm
found at: Target, Honest.com

71IVvCp9r2L._SX522_

Days 4 & 5 of my daughter’s life were the HARDEST of my life. I would actually go through that 30 hour labor all over again instead of those 2 days. I mean that. Everything is so mentally draining and physically painful. {It probably didn’t help my entire team of leaders was relaxing in a beach house at a retreat in Myrtle Beach at this exact moment AND I was stressing that my husband was going to leave to finish out his deployment in 4 days!} Getting through those days is SO worth it, though. SO WORTH IT. I learned to feed my baby and she learned to eat. Eight months later we’re still going strong.

…but I digress. Breastfeeding Mamas…get this nipple balm.

I tried FOUR different nipple balms.
Don’t do that.
Just try this one first.
There is nothing like it.


NUMBER TWO: Epsom Salt
found at: any drug store or pharmacy section14899720

Epsom Salt baths can help speed up recovery.

My midwife told me to take an epsom salt bath 4x/day. um. what? No new mom has time for that. At least….I didn’t MAKE time for it. I did, however, have at least one every. single.day for about 7 weeks. Sometimes I had more. This bath actually became a good spot to nurse my baby.

Epsom Bath Directions: Simply fill the bath with about 4-6 inches of water and 1 cup epsom salt


THE NUMBER ONE best product: Witch Hazel
found at: any drug store or pharmacy section
11454823

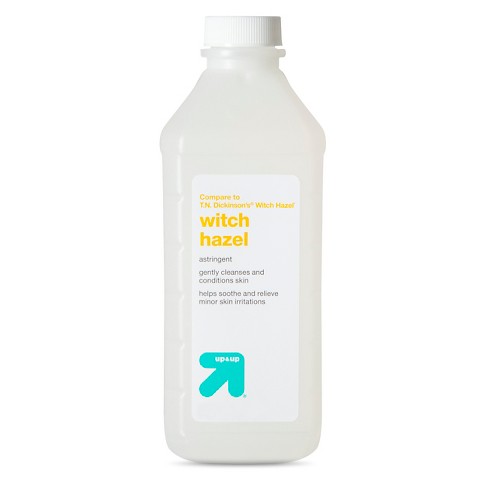
What is this? I still don’t know. Magic witch craft I suppose?
Basically, it’s used to help heal skin abrasions. Just go buy a whole boat load of it!

I used this for TWO main things per the direction of my midwife.
1) your peri bottle will be about 8oz; fill it with 1 oz witch hazel and the other 7 water EVERY. SINGLE. TIME.
2) I used it to make postpartum healing pads. Follow these directions to make your own.


There you have it! My top 4 favorite products to have on hand right after baby. Better go stock up before baby arrives!

blog sign

Postpartum Healing Pads

pad cover

I’m a huge wimp when it comes to anything cold – including icing injuries.
These, however, were a lifesaver during the early days.

Before baby arrives…invite a friend over, make up a batch of these, and stick them in your freezer & wait!

{NOTE: The only thing I’d consider doing different next time is adding essential oils- I feel as though I’m the only person on earth who knows nothing about these, but here they’re quite amazing! If you’re in the know…go ahead and mix them in, too!}

Supplies:
Aloe Vera
Witch Hazel
Somewhat thick maxis
Gallon Ziplock Bags
(optional: essential oils; perhaps lavender)

Directions:
●Open up a pad; leave the back packaging on -you’ll need to rewrap it.
●Pour two tablespoons of witch hazel throughout the pad….yup. it’s like the commercials with the weird blue liquid!
●Drizzle Aloe Vera then spread with spoon
●Wrap back up & store in ziplock bag
●Toss in the freezer and wait for baby!


Check out my favorite postpartum baby products here!

blog sign

IKEA Hack Coffee Table

cover

You may or may not know that when I moved from Wisconsin to California, my dad drove out with me and all my stuff, then flew back. We made it to somewhere in Iowa and broke down. Yup! That happened… Long story short (I didn’t get my car in CA until 33 days later) we ended up transferring everything from my car into a rental truck and going the rest of the way.

All items made the transfer EXCEPT (dun dun dun)….our coffee table!

It was a “beautiful” SOLID old piece my husband found on the curb during his college days. I cannot even tell you how many times that table has been danced on, spilled on, and dinged up. We kept it, though, because it was a genuinely sturdy piece of wood with a ton of character, many stories, and GREAT potential fora refurbishing.

{I’m not even sure how, but through coordination of a few traveling nomads, it ended up back in Wisconsin and is currently being stored in my dad’s shop…going on 3 years now. SOMEDAY!}

Upon arriving in California, we lived without a coffee table (for way too long), then finally broke down and bought a $19.99 piece of black plywood from IKEA. It got the job done, but didn’t ever really “fit”…especially once we bought & moved into our home.

lack-coffee-table-brown__57540_PE163122_S4-2
Last November we kind of decided it would be fun to tackle a team project…the coffee table seemed like a no brainer!

I searched around for a little inspiration, and found these two tables:

I’m very happy with how it turned out! Here is a loose set of directions if you’d like to make your own.

Supplies:
●IKEA table (or any old table)
●tape measurer & pencil
●wood slabs (cuts & amount dependent on design desire; see directions)
●saw horses
●table saw
●distressing tools (hammer, chisel, chain, wire brush, etc)
●sander
●desired color stain (brushes/sponges/rags)
●wood glue
●clamps (at least 4 small & 1 large)
●polyurethane
●patience

1) Making Cuts
First, decide what you want your table to look like. What kid of wood? How far should the edges hang over?

We ended up deciding to go with 4×1 slabs, and chose pine-because I like the character the knots add- with the wood hanging over on each end (approximately 1/5 inches on the ends & 1 inch on the sides). This is completely up to you.

  1. Take a few measurements
  2. Do a little math
  3. Head to the lumber yard & buy what you need
  4. Make cuts yourself, or have them cut right at the lumber yard
  5. Lay slabs out across saw horses as if a table top.

table wood

I then (spent way too much time) flipping, turning, and rearranging the boards to get just the look I wanted. We labeled the bottom to ensure they would stay in that order.

During this extensive flipping, turning, cutting, I decided to add a twist! (pun intended). Instead of both the top and the bottom levels of the table running parallel boards, I decided the bottom level slabs should run perpendicular with the top level. I like the dimension it added!

2) Distressing the Wood

I’ve never done this before! It was great fun. I was definitely way more “meticulous” than necessary – it is probably best to just go at it without thinking about it!

distress tools

We didn’t have a chain, otherwise I would have used that. Instead, I used a hammer, chisel, & wire brush. After seeing the end product, some of my favorite spots are the biggest gouges, which I didn’t know until after it was sitting finished and in my living room. Feel free to youtube a few videos on how to do this!

Here are a few of my favorite marks:

I would recommend sanding all the corners down so they’re somewhat curved, giving an older look.

3) Staining the Wood

Grab a color stain that compliments the rest of your furniture, and start staining! I prefer to use a piece of cotton (rag, old t-shirt, etc) over a brush or a foam brush, but any are okay. Apply generously, wait 24 hours, then do it again! Be sure to go over the ends and underneath; anywhere the wood will be exposed.

stained wood

4) Applying Wood to Table

{We started with the bottom level first to “practice” as any mistakes would be less noticeable}

  1. Clean the old table, sand the surface for maximum adhesive, then clean again.
  2. Line up the boards as desired. Take a few measurements to make sure everything is set, then double check it just one more time.
  3. Remove one end board, apply glue to the top of the table, line up carefully, then place board to desired spot on table.
    glue on table
  4. Apply pressure being careful the board does not shift.
  5. Take the board next to it, apply glue to top of table and SIDE of board (that it will be touching), then press and hold it down.

  6. Continue and complete entire row. Repeat all steps for the 2nd level.

5) Applying Pressure with Clamps

Add clamps to ensure constant pressure is being applied for duration of dry time (see glue bottle).

clamped wood

  1. Lay down a piece of cardboard on top of your table surface to prevent scratching.
  2. Lay a scrap 2×4 perpendicular across the top of the cardboard – we used two, one on either end of the table.
  3. Squeeze clamps on both ends of the 2×4 from top of surface to underneath in order to squeeze boards to table (see photo).
  4. In between these two boards, lay a large clamp (without a 2×4) perpendicular to the table boards. Squeeze clamp from  one side to the other in order to squeeze boards together (See photo).
  5. Let clamps sit for 24 hours

6) Apply Polyurethane 

poly

  1. Using a foam brush, spread a coat of polyurethane over your table to prevent stains from every day use.
  2. Let dry for about 24-48 hours, then apply at least one more coat.

Move your new table inside and enjoy!

Here was our final team product!

final 4final 2final 1final 3

Is it a forever piece? Nah.
…but it was definitely fun to create and will certainly get us through the next few years.

Share your own hack in the comments!

blog sign

Not-Your-Typical Strawberry Oatmeal

IMG_2436

We’ve ALL had that flavored instant oatmeal…”strawberries & cream” or “apples & cinnamon”…you know what I’m talking about!

Here’s a new spin with better flavor & less sugar. WHOA!

DIRECTIONS
Ingredients: desired amount of oats, water, & strawberries

●Cook oatmeal as directed.
●While oats are cooking, slide & dice a few strawberries.
●Use a potato masher on a plate to turn them into mush.
●Pour strawberries on top of oatmeal (including all the juice) and mix in!

Other options: sprinkle with chia seeds, or mix in mashed banana.

Enjoy!

blog sign

Those Two Little Feet are Watching

little feetYou know what isn’t easy?

Going against the grain.
Doing something out of the ordinary.
Taking a CHANCE on yourself.


But you know what IS easy?

Doing what you know in your gut…in your HEART…is absolutely the right thing for you and your family, regardless of how others feel about it.

…and you want to know why I do what I do?
 
WHY am I so PASSIONATE about this crazy-unusual-work-from-home-help-other-people-get-healthy-run-a-business-with-a-social-media-platform?
 

👣Those two little feet. Right there.👣
 
Because she’s watching. She’s watching everything I do. 


●Because I want to say, “I’ll be there” when she asks me to come to an event. No asking off work, rearranging my meetings, or using vacation.
 
●Because I want to give her every experience or opportunity I possibly can. Those aren’t always free.
 

●Because I want to jump around with her on the beach instead of hiding in the shade under a coverup. Regardless of my size or what I look like, I’m submerged in a community where I’m comfortable in my own skin, and she will know that comfort.
 

●Because I never want her to hear the word “diet” {as in “going on a diet”} come out of my mouth. ever. We eat yummy, REAL food that FUELS our bodies.


●Because I need her to KNOW there is more in life than going to work to JUST to pay the bills. 


So, yes. I we live out loud & I post frequently.
I do this in hopes of inspiring ONE person who needs it, ONE person who says “Wow, I’m going through that, too.”, ONE person who needs a POSITIVE break from their negative news feed. Impacting that ONE person makes a difference in their life. In their family’s life. 

 
I’m proud of what I do.
I’m proud of how hard I work.
I’m proud of the lives I’m changing- including my own.
 

…and those two little feet are right there watching👣


{You get ONE life. Live it the way YOU want to …& surround yourself with others who support that decision}

Thoughts during first run of 22 Minute Hard Corps

I got a package in the mail yesterday!
…I opened it up to find a new military style fitness program.
Basic moves, nothing fancy.
Quick. Efficient. In & Out in 22 minutes.
Have you heard of P90X? This program has the same trainer, Tony Horton.
Also—–there’s a sandbag…and it’s HUGE! (<—just like my muscles will be! 😂)

12717608_10103251859020518_8572193427697234025_n-2

I thought I should do a little “preview” workout before the group kicks off on Monday. I think I’ll spend the next two days recovering!

😆Just kidding.
You can totally do this, too💪
It’s time to get back to the basics….

Here are my thoughts during the first stab at 22 Minute Hard Corps with Tony Horton:

“T jacks? I got this.”

“Oh, all veterans? That’s neat.”

“Pssh. I can do that”
{8 counts later}
“Well that’s harder than it looks.”

“Tony isn’t very funny. Did he really just say that?”

“Wait. Gorilla what?!”

“Okay. Tony is a little funny.”

“Nothing is funny.”

“This move emphasizes my leg-jiggle”

“Be nice to yourself, Ali…now say something positive: ‘I’m excited to see my legs strengthen with this program.'”

“Thanks for the water break, Tony.”

“I’m glad I’m on carpet and not in the dirt like they are.”

“Soooooo- cardio is hard.”

“Look at how cute Nora is over there watching me jump around look a goofball.”

“I’m tapping out. Okay, I won’t. But I really want to.”

“These moves are actually all simple. Not easy. But simple.”

“Ohhh I’m going to feel this tomorrow.”

“Where is that modifier?”

“March, Tony. I’m just gonna March.”

“This is tough.”

“There’s Tony thinking he’s funny again.”

“Is it over yet?”
Yup! It is. Because it’s only 22 minutes….a no-nonsense 22minutes!

There are about 30 of us starting the REAL DEAL on Monday. Want to join us? Get back to the basics with us!

Shoot me an email (alischroeder.fit@gmail.com) to get in on this!

New fitness program? I’m skeptical…

22HC— I’m a little SKEPTICAL —

Can you blame me?

My husband is in the Armed Forces, and I was (indirectly) there while he went through some intense training. His days were WAY longer than “22 minutes” (😂😂😂) … so I’d by lying if I said the title of this new fitness program didn’t throw me for a little spin. Being real.

Here me out, though, on why I’m giving “22 Minute Hard Corps” a shot anyway….

HERE’S WHAT I KNOW:
1️⃣The idea behind this program came when our CEO didn’t want the “u-rah-rah encouraging cheerleader” type of trainer during a morning workout….he wanted somebody yelling at him, telling him what to do.
➤I have days I need this, too.

2️⃣ A good friend was a participant in the official “test group” before it was released to the public, and her results are 👌
➤I’m curious if I can have similar results.

3️⃣Tony Horton (the 22 Minute Hard Corps trainer) is also the creator of P90X….which is a very credible program.
➤I know P90X revolutionized home workouts – I’m interested.

4️⃣I’m short on time, and since my goal (like many of you) isn’t to be in the military but I wouldn’t mind that style of workouts.
➤This seems like a good option.

5️⃣Ultimately, I trust the company I partner with to ONLY put out quality products.
➤I’ve only had good experiences; I’d like to trust them on this one, too.

PLUS- there aren’t any actors in this program…all of Tony’s backup are veterans (how NEAT is that?!)

🇺🇸I hope my skepticism slaps me right in the face!🇺🇸

If you have little to zero time….get in on this with me!

This program is on sale all of July 2016 with the sandbag included💪

Shoot me a message or send me an email for the deets! (alischroeder.fit@gmail.com)

#hardcorps #getsome

Weekly Meal Prep Example

MEAL PREP —> doesn’t have to be scary!

meal prep3

I receive messages from time to time about what exactly I eat so I decided to share publicly this week. Here is this week all laid out on the table for you (literally)😂

A little time invested on Sunday makes the week run SO MUCH smoother on a few different levels: 
1) it prevents me from mindlessly shoving food in my face (most of the time😉)
2) It actually ends up SAVING time (ex: I was cooking chicken for today anyway, why not cook an entire rack, spiced different ways so I can just grab n go during the week?)

Will I stray from this a bit? Totally.
I might switch a few meals around depending on my tastebuds for the day…. or add a snack if I need it. I’m still Nora’s primary source of food, so I tend to ALWAYS be hungry! Even with those hiccups, I think I still come out on top thanks to the PLAN & PREP!

For the visual learners: check out the graphic.
Those of you who prefer it spelled out….see below!

———————————————

MONDAY
Breakfast: scrambled eggs with zucchini
Snack 1: ShakeO + banana & almond milk
Lunch: Avocado chicken wrap
Snake 2: Apple + peanut butter (AND YES, those are chocolate chips!)
Dinner: Ground Turkey Mix (sweet potatoes, peppers, onions, etc)

TUESDAY
Breakfast: Oats with strawberry Shakeology
Snack 1: Hard boiled egg
Lunch: Tuna salad over greens
Snack 2: Smoothie Bowl
Dinner: Italian Herb chicken w/ broccoli

WEDNESDAY
Breakfast: Eggs over easy w/ peanut butter & toast
Snack 1: Shakeology + blueberries
Lunch: Lemon Pepper chicken + Green beans
Snack 2: pea pods with humus
Dinner: Tacos (or taco salad)

THURSDAY
Breakfast: scrambled eggs with spinach & tomatoes
Snack 1: nuts (sprouted pumpkin seeds + unsalted peanuts)
Lunch: Chicken Salad
Snack 2: Shakeology + coffee
Dinner: Leftovers

FRIDAY HEADED TO THE CARIBBEAN CRUISE!

What are you eating this week? 

5(:00) AM vs PM Workout Tips!

It’s Workout Wednesday: Whether you workout at 5:00 AM or 5:00 PM, here are 5 tips to CRUSH it.

12717462_10103176976430828_2852737223476918470_n

Studies show people who exercise before breakfast burn fat more efficiently throughout the day, while happy-hour exercisers benefit from peak levels of flexibility, endurance, and strength.

What time of the day do you workout? Before you get your day started? Or just as you’re finishing it? Either way, here’s a few tips to get you started on those days you feel like saying no.

Morning Workout Tips 
1) Envision waking up early and working out AND enjoying it! It may sound silly but visualizing success is an important step! For just a few minutes before bed, imagine yourself waking up easily to your alarm, getting your workout done and feeling energized!

2) Layout your workout clothes the night before (or wear them to bed!). You want your morning to be as seamless as possible. Make it as easy as possible to get going, so make sure you don’t have to search around in the dark for your workout stuff. 

3) Do what is necessary to wake up. Put your alarm clock across the room, play some fun upbeat music or turn on all the lights.

4) Think about your coffee or healthy breakfast you will get when you are done. No, you shouldn’t “reward” yourself with food by promising yourself splurges for working out. BUT thinking about that hot cup of coffee or delicious Shakeology I am going to enjoy as soon as I am done has kick started plenty of workouts for me.

5) Don’t be afraid to ease into morning workouts. If it helps you mentally adjust to getting up for morning workouts, try every other day the first week. Work up slowly if you need to so you can STICK to it long term.
.
Evening Workout Tips
1) SCHEDULE IT! We’re busy! We have things to do! Sometimes they don’t all get done before bed. If you tell yourself you WILL workout between 6:30-7:15 (or whenever), it’s more likely to actually happen. 

2) Change into your workout clothes before you leave work. This might seem silly since many of my followers workout at home, but try it! Pack your clothes as if you were going to the gym, and drive home in them. You’ll be set to push play when you walk in the door.

3) Use your commute to relax & recharge. Put on your favorite music or podcast or just have quiet time. By the time you get home, you’ll be ready to go.

4) Time your meals. It is best not to work out on a full stomach, so plan accordingly. Be sure to press play before you make dinner, or not for another few hours after you’ve already eaten.

5) Once you’re home from work, don’t allow yourself to sit down (ANYWHERE!) until you workout. Not the couch, not the bed, not the kitchen chair. Try it!

There you have it…

Let me know, when do you workout? What other tips do you  have?

4 HEALTHY(ish) Super Bowl Appetizers!

superbowl graphicThis Sunday is Super Bowl Sunday! Totally okay to veg out and go after the delicious array of food (I definitely plan on it!). That being said, there’s no reason you can’t add a healthy-ish option to the spread…right? Here are a few options:
.
1) Spinach Artichoke Dip
recipe & photo credit: theyummylife.com
http://www.theyummylife.com/Spinach_Artichoke_Dip 

2) Baked Bloomin’ Onion
recipe & photo credit: gimmesomoven.com
http://www.gimmesomeoven.com/baked-blooming-onion/

3) 7 Layer Dip
recipe & photo credit: beachbody.com
http://www.teambeachbody.com/teambeachbodyblog/nutrition/healthier-seven-layer-dip-2

4) Sweet Pepper Poppers
recipe & photo credit: sugarfreemom.com
http://www.sugarfreemom.com/recipes/low-carb-cheesy-sweet-pepper-poppers/

I realize a few of these still have a decent chunk of cheese in them, but at least the deep-frying is somewhat avoided!

{personally….#4 is my FAVORITE!}

blog sign